Archive
Fix: Notification ‘Not enough system resources’ on Foscam NVR
If you try to playback recorded video via a Foscam NVR, you may get the message ‘Not enough system resources’ on screen.
Foscam suggests that this occurs on 4-screen configurations and that you have to double-click one of them to see the respective channel’s recorded video.
https://www.foscam.eu/faq/article/notification-not-enough-system-resources
However, it didn’t work when I tried it (that Foscam NVR hadn’t been recently firmware updated though, so that might have been the cause.
An alternative that did work was to download and use the free Foscam VMS software to do playback. Seems access via web browser can also be enabled on the NVR so that might also be an alternative. All methods of playback (including trying to play from the NVR itself if a screen is already attached) are explained at:
https://www.foscam.com/faqs/view.html?id=78
One can also opt to download videos from the NVR either via a computer, or to a USB storage device connected to the NVR, as shown at:
Fix: PC CPU speed too low
If your PC’s CPU speed is showing up too low say in CPU-Z (and thus your computer crawls), try turning off “BD PROCHOT” signal using the ThrottleStop tool.
Note that is not related to the PROCHOT processor overheating signal, but instead stops external sensors (that may be misfunctioning) to trigger CPU throttling, as mentioned at
https://linustechtips.com/topic/1515676-cpu-throttles-to-078ghz-when-unplugged-bd-prochot/
BD PROCHOT and PROCHOT (processor hot) are two separate signals within Intel CPUs. BD PROCHOT allows sensors external to the processor to trigger throttling. Toggling BD PROCHOT on or off does not in any way interfere with the PROCHOT signal. PROCHOT is generated internally. For safety reasons, there is no feature in ThrottleStop that lets you disable the PROCHOT processor hot signal.
Fix: MacBook sleeps at lid closing when on power
If you’re using a recent MacBook you may find that various suggestions found on the web on how you’d keep it from sleeping when you close its lid while on power (especially if you want to have it display only on an external monitor) are obsolete.
There seems to exist an opensource kernel extension (and other similar tools) called NoSleep, working mostly for Intel CPUs (unless you compile from source), but why waste CPU cycles when there is an option for that (probably added more recently by Apple)?
Just go to Settings / Monitors and press Advanced… button (the one at the bottom left in the Greek screenshot below).
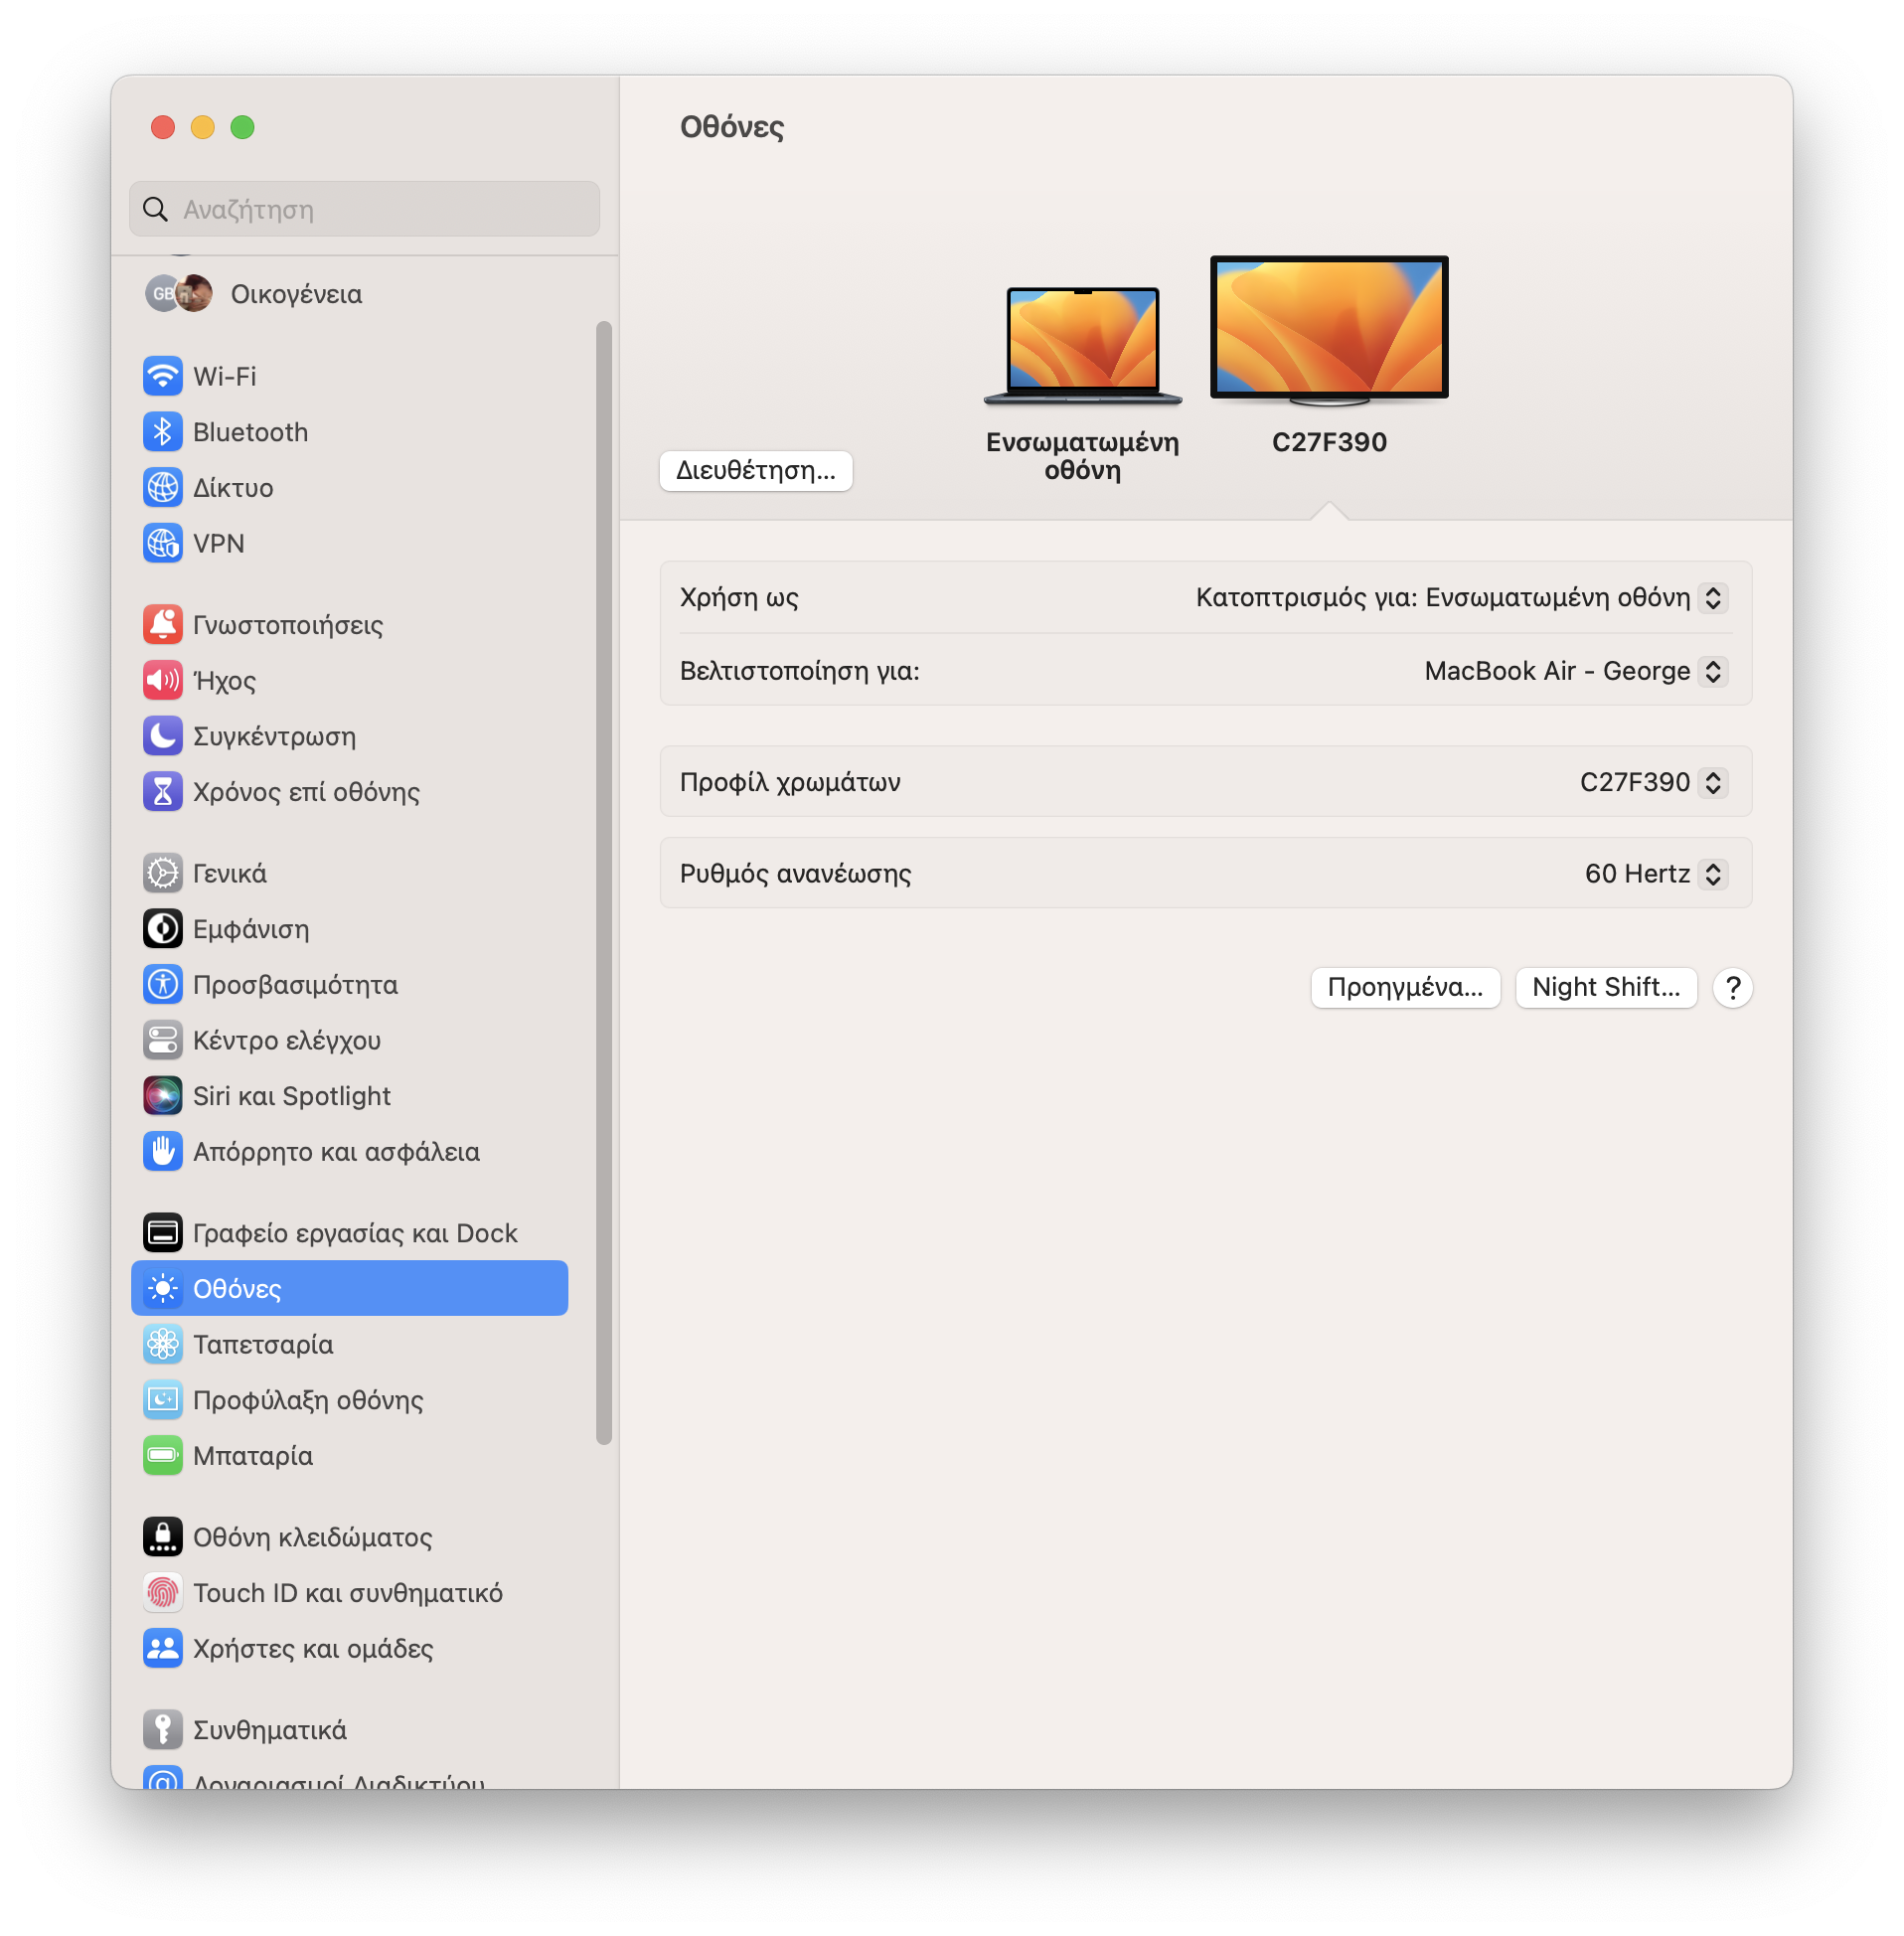
At the advanced options popup just turn off the last switch, the one that prevents automatic transition to sleep mode when external power-source is connected and the monitor gets deactivated. Now connect a monitor, an external keyboard and a mouse/trackpad and close that lid without worries.
This should also be useful if you want to keep your MacBook live for an extended time to download something big, but don’t want your MacBook internal keyboard and screen to gather unnecessary dust by being kept open, nor want your system to sleep and pause downloading when your external screen eventually gets deactivated due to perceived inactivity.

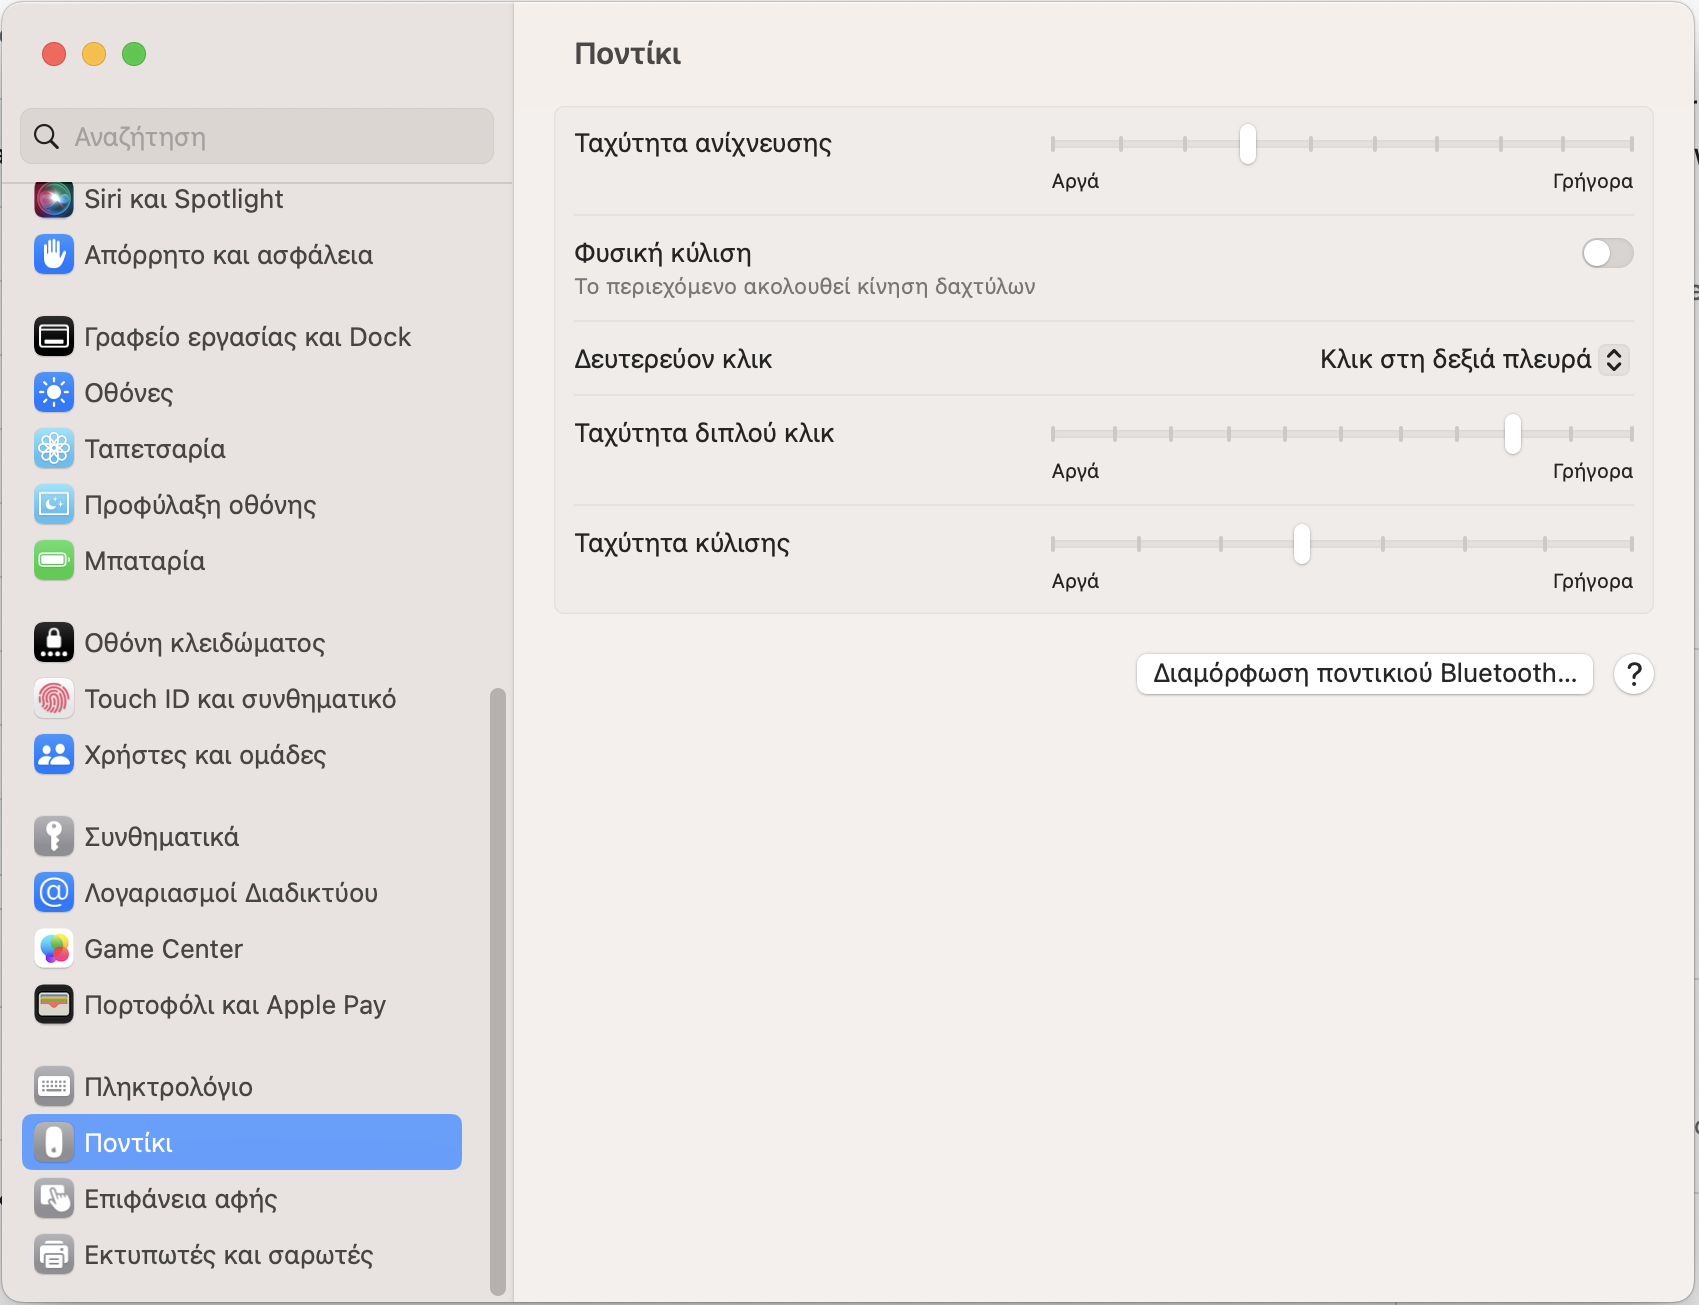
Fix: MacOS-X mousewheel scroll like on Windows
If you’re a long-time Windows user you may get puzzled when you connect a mouse to your MacBook Air and realize that the mouse wheel is scrolling documents and webpages in the reverse direction than it does on Windows.
Luckily, this is controlled by an option in Settings. Pick Mouse on the lefthand bar and then you should see a “Natural scroll” option claiming that the “natural” is to follow the fingers movement (as if you were panning with two fingers on a touchpad that is).
Note: screenshots below are in Greek, but should be easy to follow the icons

Well, not that natural since the mouse wheel keeps on rolling without your fingers going much down as they do on a touchpad, making you feel very strangely, esp if you’re coming from the Windows world, or you’re switching often between operating systems.
Just turn off that toggle switch and you’re ready to scroll again like a king!
Fix: javascript location.hash throttling issue with IFrame
I had implemented a simple (and most importantly working in older browsers too) way of communication between an IFrame and its parent page via location.replace(“#” + hash), which doesn’t add entries to history like location.hash=… does, and the onhashchange event, when I noticed Edge-Chromium was throwing a “Throttling navigation to prevent the browser from hanging.” error and the lon/lat fields I had on my test page wheren’t updating anymore when I was dragging quickly for a while my location picker marker on an OpenLayers map. If I released the marker and tried after a sec it was starting working again.

since the URL shown in the error message redirects to some page that has permission denied, I looked up a discussion that explained the “–disable-ipc-flooding-protection” Chromium switch to turn off that protection, however I was not having any loop in my code that was mentioned in that discussion as probable cause.
https://stackoverflow.com/questions/55925936/angular-7-throttling-navigation-to-prevent-the-browser-from-hanging
On Firefox there was a similar error but with other message:

Searching about it I read about the “debouncing” concept (to avoid flooding some API with consequtive requests too fast/often) at
and
https://stackoverflow.com/questions/35991867/angular-2-using-observable-debounce-with-http-get
And ended up finding a simple implementation of it at
https://medium.com/@griffinmichl/implementing-debounce-in-javascript-eab51a12311e
that I adapted to run in older browsers (like IE11) too:
function debounce(func, wait) {
var timeout;
return function() {
var context = this;
var args = arguments;
clearTimeout(timeout); //clear previous scheduled execution if still pending
timeout = setTimeout(function() { func.apply(context, args); }, wait);
}
}function setLocationHash(hash) {
window.location.replace("#" + hash); //don’t set window.location.hash directly, adds entries to browser history
}setLocationHashDebounced = debounce(setLocationHash, 20);
//this will make sure any setLocationHash calls that occur within 20msec replace any pending ones (all are timed to execute in steps of 20msec)//…
function markersUpdated(otherLocations) { //callback
theOtherLocations = otherLocations;
if (theOtherLocations.length > 0) {
var hash = theOtherLocations[0].toString();
setLocationHashDebounced(hash);
}
}function hashChanged() {
var hash = window.location.hash.substring(1);
if (hash.length > 0) {
var hashParts = hash.split(‘,’);
if (hashParts.length >= 2){
var location = [hashParts[0], hashParts[1]]; //[lon, lat]
map_addOtherMarker(location); //Note: this will just move selected marker if existing and otherLocations.length = _maxOtherLocations > 0
if (hashParts.length >= 3 && hashParts[2] == "zoom")
zoomToLocation(location);
}
}
}
Fix: WordPress not detecting updates, wp_options table corruption
I have been trying recently to troubleshoot a WordPress website that was not detecting available core and plugin updates. So I installed WordPress Debug Bar plugin and after enabling WP_DEBUG in wp-config.php I could open the Debug menu from the WordPress admin bar and see some errors being logged.

At the wp-content/wp-debug.log file that I had enabled to log wordpress errors, I could see entries like the following (in mixed Greek/English):
[26-Jan-2021 13:15:10 UTC] Σφάλμα Duplicate entry ‘113343’ for key ‘wp_options.PRIMARY’ βάσης δεδομένων WordPress για αίτηση INSERT INTO `wp_options` (`option_name`, `option_value`, `autoload`) VALUES (‘wt_cli_start_date’, ‘1611666910’, ‘yes’) ON DUPLICATE KEY UPDATE `option_name` = VALUES(`option_name`), `option_value` = VALUES(`option_value`), `autoload` = VALUES(`autoload`) από require(‘wp-load.php’), require_once(‘wp-config.php’), require_once(‘wp-settings.php’), include_once(‘/plugins/cookie-law-info/cookie-law-info.php’), run_cookie_law_info, Cookie_Law_Info->__construct, Cookie_Law_Info->load_dependencies, require_once(‘/plugins/cookie-law-info/includes/class-cookie-law-info-review_request.php’), Cookie_Law_Info_Review_Request->__construct, Cookie_Law_Info_Review_Request->check_condition, Cookie_Law_Info_Review_Request->reset_start_date, update_option, add_option
Checking the wp_options table with phpMyAdmin I didn’t see it having an option_id with such a value so I opened up the definition for that table from the sidebar and it seems PRIMARY is an index on that table, while the key is option_id as I originally though.

Did a new search on it and found this article
from a guy I already trusted due to other nice articles on databases. It was as it seems a database corruption (guess the index is corrupted) and running
REPAIRTABLEwp_options
was enough to fix it.
So via phpMyAdmin’s SQL Code tab I executed that simple SQL command and suddenly Wordpess could find core and plugin updates again:

HowTo: make raw_input & input work the same in both Python 2 and 3
Was just trying to make a Python 2 script work in Python 3 and at first it seemed I just needed a small change to add missing parentheses to the argument of a couple of print statements.
But then another issue came up, it wasn’t understanding the command raw_input(somePrompt) that was occuring at various places in that file to input text from the console.
Various solutions were proposed at
https://stackoverflow.com/questions/954834/how-do-i-use-raw-input-in-python-3/62825723
but I think I came up with a cleaner looking solution that works in both Python2 and Python3, that should allow one to use either raw_input or input in both Python2 and Python3 with the semantics of Python2’s raw_input (aka the semantics of Python3’s input).
# raw_input isn't defined in Python3.x, whereas input wasn't behaving
# like raw_input in Python 2.x. This should make both input and raw_input
# work in Python 2.x/3.x like the raw_input from Python 2.x
try: input = raw_input
except NameError: raw_input = input
In practice this came up from ideas at other answers on that SO thread. It tries to define input as raw_input which should fail in Python3.x since raw_input is undefined. In that case it will catch a NameError exception and do the reverse, aka define raw_input as input. However in Python2 the first command should execute fine, overriding the insecure input of Python2.x to work the same as raw_input (not trying to interpret input strings that is). Actually that is what Python 3.x input does.
Wonder why they didn’t declare it like that in the first place though, breaking compilation of Python2 programs. After all semantically only Python2 programs that were using the old insecure input would have an issue, not those that were using raw_input which is the semantics Python3 promotes with its newer input.
HowTo: Use DISM and SFC tools to check+fix your Windows installation
If you’re having issues with your Windows 7 or newer, you should consider whether its installation has become corrupted (due to malicious software or hard drive errors).
After doing a disk check (say by right clicking the appropriate drive under my computer and selecting Properties, then Tools tab and Error checking) and a complete virus scan (on Win10 you can click the shield icon of Windows defender in the taskbar tray and at scanning options choose to do a full scan – or if you have installed some third-party antivirus double-click its icon in the taskbar tray and when its GUI opens up opt to do a full scan), then try the following steps to repair your Windows installation:
1. Press WIN+R to open Run dialog
2. Type in:
CMD
Hold down CTRL+SHIFT keys and click OK to open the command line window in Administrator mode (do press Yes at the User Account Control prompt)
A (usually) black text-based console window will open up and you’ll be greated with something like:
Microsoft Windows [Version 10.0.18363.720]
(c) 2019 Microsoft Corporation. All rights reserved.
and then a prompt like:
C:\Windows\system32>
3. Type in the following and press the ENTER key:
DISM.exe /Online /Cleanup-image /Scanhealth
and press ENTER to execute the DISM tool with the option to check the windows image health and wait patiently for it to complete
Deployment Image Servicing and Management tool
Version: 10.0.18362.1Image Version: 10.0.18363.720
[==========================100.0%==========================] The component store is repairable.
The operation completed successfully.
4. In case you see a message that the component store is repairable, then when greeted with the C:\Windows\system32> prompt again, type in the following and press ENTER:
DISM.exe /Online /Cleanup-image /RestoreHealth
to repair the Windows image:
Deployment Image Servicing and Management tool
Version: 10.0.18362.1Image Version: 10.0.18363.720
[==========================100.0%==========================] The restore operation completed successfully.
The operation completed successfully.
If RestoreHealth fails and you’re on Windows 10, then you should checkout this article:
https://www.tenforums.com/tutorials/16397-repair-install-windows-10-place-upgrade.html
on how to do an in place upgrade of Windows 10, opting to keep your settings and apps
5. If all goes well you’ll see that the restore operation completed successfully and you’ll be taken again to the command-line prompt C:\Windows\system32>
Now that the windows image is checked and fine, you should check your Windows installation against that image, giving the following command and pressing ENTER:
sfc /scannow
Beginning system scan. This process will take some time.
Beginning verification phase of system scan.
Verification 100% complete.Windows Resource Protection found corrupt files and successfully repaired them.
For online repairs, details are included in the CBS log file located at
windir\Logs\CBS\CBS.log. For example C:\Windows\Logs\CBS\CBS.log. For offline
repairs, details are included in the log file provided by the /OFFLOGFILE flag.
After any automatic repairs you should see the prompt C:\Windows\system32> again. Now repeat the same step till you see no more errors found and repaired.
sfc /scannow
Beginning system scan. This process will take some time.
Beginning verification phase of system scan.
Verification 100% complete.Windows Resource Protection did not find any integrity violations.
When back at the C:\Windows\system32> prompt with no errors found and repaired, just close the console window or type in the following and press ENTER:
exit
Fix: Microworlds Pro installer showing gibberish instead of Greek
A friend sent me the other day a screenshot from the installer of Microwords Pro Greek version on Windows 10 that was showing gibberish instead of Greek. At their school on Windows 10 it was showing up fine, so they wondered what the issue was.

They mentioned that on Windows 10 english it was showing fine. So we did try changing the preferred language order of Windows (at Laguage preferences in settings), to put English first (clicking on a language there shows arrows to reorder them, but has no drag action allowed btw), then Greek and try installing again, but the issue was still the same.
Note that at first I had wondered if it was a similar issue with the OwnCloud client installation that was showing an unexpected language instead of English, but since the screenshot was showing gibberish chars I guessed it was indeed showing Greek, but at some unexpected encoding for the system’s codepage. Note that codepages are a thing of the past and not needed for Unicode programs, but they’re still needed for older programs that just used a single byte (that couldn’t fit all posisble characters in the world) to encode a character.
I noticed it was showing a WinRar icon at that installer, so wondered if they had WinRar installed, but since installers are usually self-contained, I guessed the installer had been built with some older non-unicode WinRar engine version or something.
So I suggested going to Control Panel > Change Display Language > Administrative > Change System Locale for non Unicode programs and choose Greek there instead of English and indeed it worked.
Note that to find Control Panel on recent versions of Windows 10, the easiest way is to press the Search icon on the taskbar and then type “Control Panel” (or “Πίνακας Ελέγχου” if you’re on a Greek system). On the first Windows 10 editions you could just right click the Windows 10 Start/flag button on the taskbar and select Control Panel from the popup menu shown, but it seems they’ve removed that with recent updates.
This is useful to know since it usually affects most older non-Unicode programs that expect the system to work with a specific codepage. Microsoft used to have a utility that allowed one to switch the system codepage separately for various programs instead of doing a system-wide change, but it was hard to find even back then (plus didn’t allow redistribution) and most probably doesn’t work on newer systems.
Fix: Cisco Webex Meetings install fail (AddDllDirectory @ KERNEL32.dll)
Looking into the following error message occuring with Cisco WebEx Meetings installer on Windows 7, found this useful discussion:

where the following are suggested:
– install Update for Windows 7 (KB2533623) from Microsoft:
https://www.microsoft.com/en-us/download/details.aspx?id=26767
– video tutorial:
https://www.youtube.com/watch?v=TpRRiMGJ_xA
And an extra tip, in case you after the installation, when you try to connect via a meeting URL, you see this dialog:

then try enabling TLS 1.1 & 1.2 at your browser (e.g. was told Chrome on Win7 had then both off). See how to do this for various browsers at: https://knowledge.digicert.com/generalinformation/INFO3299.html
Regarding TLS 1.1 though, mind you that it is considered insecure – so you might decide to skip enabling it (and try just enabling TLS 1.2) unless you can’t find some other solution. Quoting recent article on TLS 1.0 and 1.1 protocols:
Microsoft announced today that it will delay disabling support for the insecure Transport Layer Security (TLS) 1.0 and 1.1 protocols from Microsoft web browsers because of the current global situation until the second half of 2020, with an estimated time of roll out during July. “For the new Microsoft Edge (based on Chromium), TLS 1.0 and 1.1 are currently planned to be disabled by default no sooner than Microsoft Edge version 84 (currently planned for July 2020),” Kyle Pflug, Microsoft Edge Developer Experience Principal PM Lead, said. “For all supported versions of Internet Explorer 11 and Microsoft Edge Legacy (EdgeHTML-based), TLS 1.0 and TLS 1.1 will be disabled by default as of September 8, 2020.” https://www.bleepingcomputer.com/news/security/microsoft-delays-disabling-insecure-tls-in-browsers-until-july/
