Archive
Fix: MacBook sleeps at lid closing when on power
If you’re using a recent MacBook you may find that various suggestions found on the web on how you’d keep it from sleeping when you close its lid while on power (especially if you want to have it display only on an external monitor) are obsolete.
There seems to exist an opensource kernel extension (and other similar tools) called NoSleep, working mostly for Intel CPUs (unless you compile from source), but why waste CPU cycles when there is an option for that (probably added more recently by Apple)?
Just go to Settings / Monitors and press Advanced… button (the one at the bottom left in the Greek screenshot below).
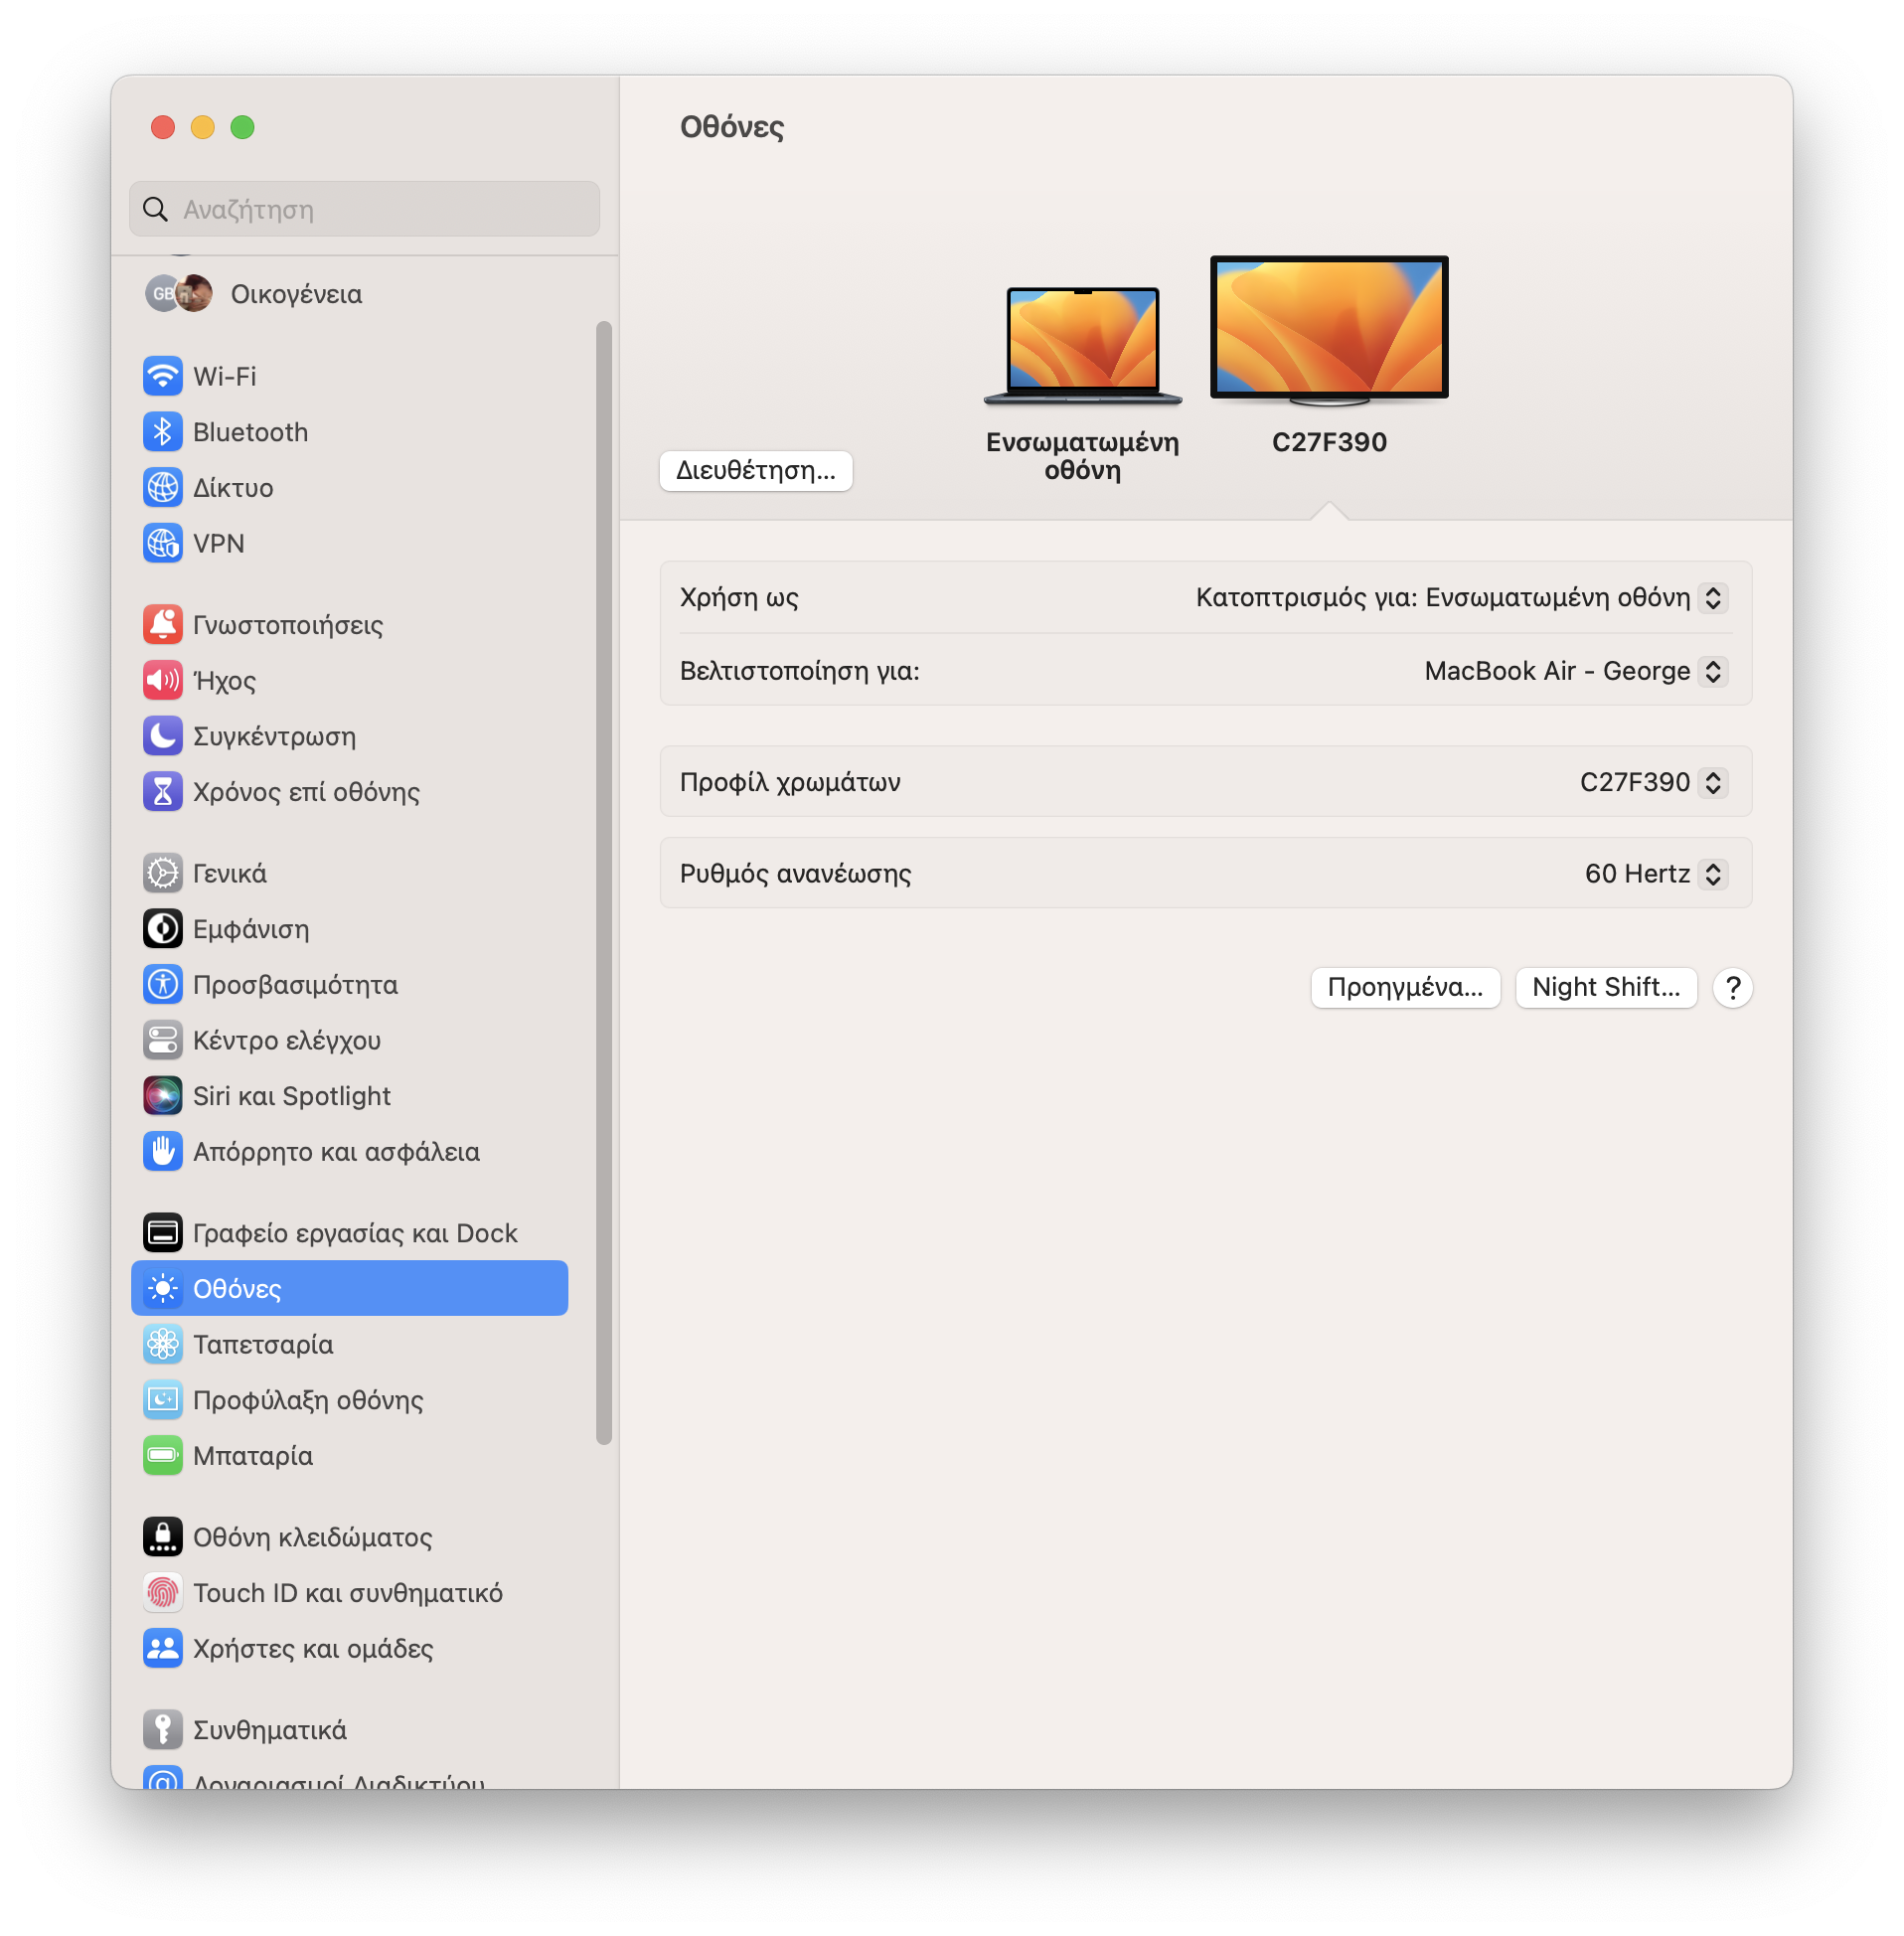
At the advanced options popup just turn off the last switch, the one that prevents automatic transition to sleep mode when external power-source is connected and the monitor gets deactivated. Now connect a monitor, an external keyboard and a mouse/trackpad and close that lid without worries.
This should also be useful if you want to keep your MacBook live for an extended time to download something big, but don’t want your MacBook internal keyboard and screen to gather unnecessary dust by being kept open, nor want your system to sleep and pause downloading when your external screen eventually gets deactivated due to perceived inactivity.

Fix: MacOS-X mousewheel scroll like on Windows
If you’re a long-time Windows user you may get puzzled when you connect a mouse to your MacBook Air and realize that the mouse wheel is scrolling documents and webpages in the reverse direction than it does on Windows.
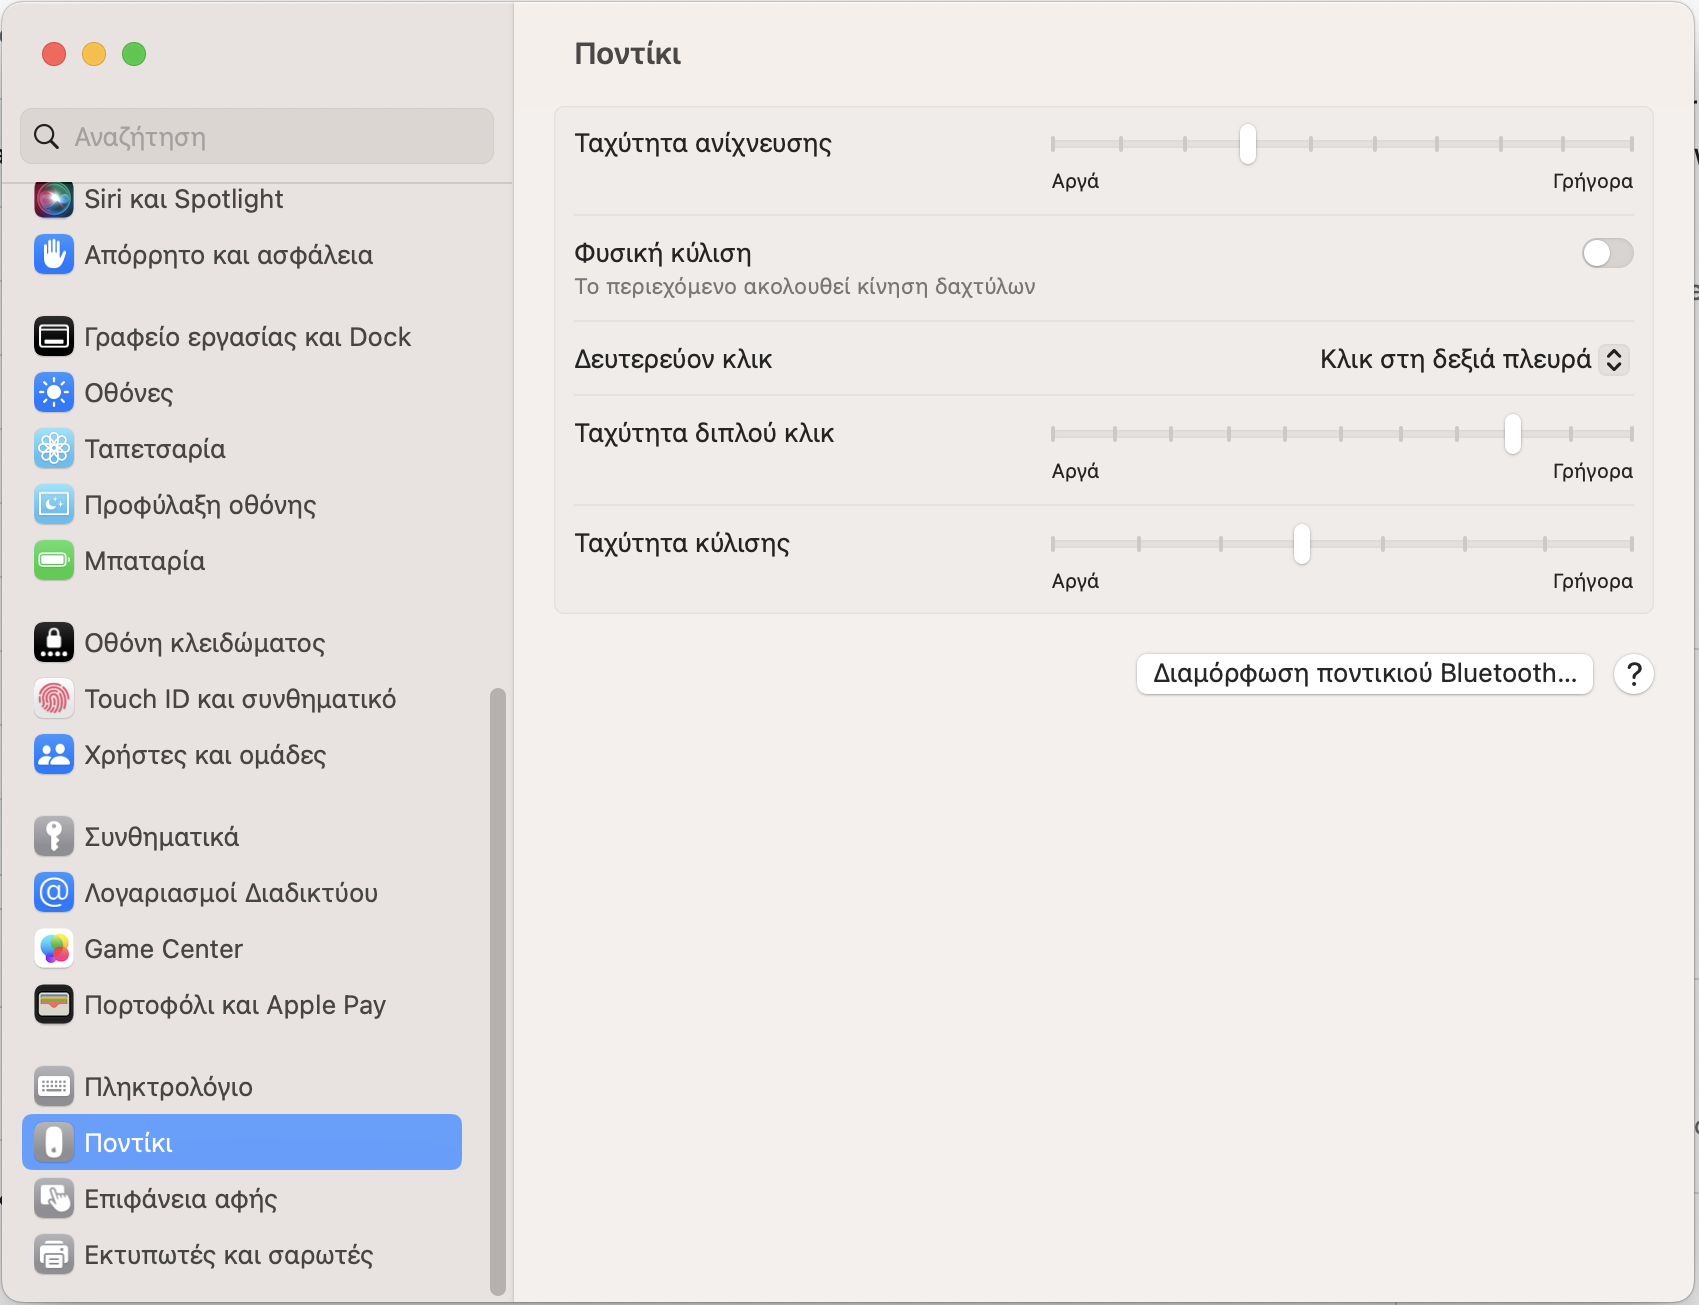
Luckily, this is controlled by an option in Settings. Pick Mouse on the lefthand bar and then you should see a “Natural scroll” option claiming that the “natural” is to follow the fingers movement (as if you were panning with two fingers on a touchpad that is).
Note: screenshots below are in Greek, but should be easy to follow the icons

Well, not that natural since the mouse wheel keeps on rolling without your fingers going much down as they do on a touchpad, making you feel very strangely, esp if you’re coming from the Windows world, or you’re switching often between operating systems.
Just turn off that toggle switch and you’re ready to scroll again like a king!
HowTo: Drop files onto Silverlight controls
I was recently adding drop-files support to ClipFlair Studio, so I had to do some research on the related API that is available to Silverlight apps.
Silverlight supports a limited set of Drag-and-Drop interaction with the operating system (supposedly for security reasons, but most probably because of the classic cross-platform implementation pains).
For example it allows you to drop a collections of file objects from the operating system’s file explorer (or other similar application) onto a Silverlight drop target, but not the other way around.
Also, it doesn’t allow dropping other flavors of content, like text, images etc., only collections of file objects.
To allow dropping files onto a Silverlight control you set AllowDrop property to true and handle the Drop and optionally the DragEnter/DragOver/DragLeave events to provide visual feedback during the drop operation (mostly when over the drop target, unless you do Mouse Capturing).
<RichTextBox
x:Name="rtb"
…
AllowDrop="True"
Drop="rtb_Drop"
DragEnter="rtb_DragEnter"
DragOver="rtb_DragOver"
DragLeave="rtb_DragLeave"
/>
#region DragAndDrop
private void rtb_Drop(object sender, System.Windows.DragEventArgs e)
{
VisualStateManager.GoToState(this, "Normal", true);//the Drop event passes in an array of FileInfo objects for the list of files that were selected and drag-dropped onto the RichTextBox.
if (e.Data == null)
return;IDataObject f = e.Data as IDataObject;
if (f != null) //checks if the dropped objects are files
{
object data = f.GetData(DataFormats.FileDrop); //Silverlight only supports FileDrop
FileInfo[] files = data as FileInfo[]; //…GetData returns null if format is not supportede.Handled = true;
if (files != null)
//Walk through the list of FileInfo objects of the selected and drag-dropped files and parse the .txt and .docx files
//and insert their content in the RichTextBox.
foreach (FileInfo file in files)
Load(file, false);
}}
private void rtb_DragEnter(object sender, System.Windows.DragEventArgs e)
{
VisualStateManager.GoToState(this, "DragOver", true);
e.Handled = true;
}
private void rtb_DragOver(object sender, System.Windows.DragEventArgs e)
{
e.Handled = true;
//NOP
}private void rtb_DragLeave(object sender, System.Windows.DragEventArgs e)
{
VisualStateManager.GoToState(this, "Normal", true);
e.Handled = true;
}#endregion
For the visual feedback you can use VisualStateManager and respective VisualStates at say a Grid that wraps the drop target in the XAML layout.
<Grid x:Name="LayoutRoot">
<VisualStateManager.VisualStateGroups>
<VisualStateGroup x:Name="DragStates">
<VisualStateGroup.Transitions>
<VisualTransition GeneratedDuration="0:0:0.3">
<VisualTransition.GeneratedEasingFunction>
<CircleEase EasingMode="EaseIn"/>
</VisualTransition.GeneratedEasingFunction>
</VisualTransition>
</VisualStateGroup.Transitions>
<VisualState x:Name="Normal"/>
<VisualState x:Name="DragOver">
<Storyboard>
<ColorAnimationUsingKeyFrames Storyboard.TargetProperty="(Control.Background).(SolidColorBrush.Color)" Storyboard.TargetName="rtb">
<EasingColorKeyFrame KeyTime="0" Value="#FFFFF7D1"/>
</ColorAnimationUsingKeyFrames>
</Storyboard>
</VisualState>
</VisualStateGroup>
</VisualStateManager.VisualStateGroups>
Note that on MacOS-X Safari doesn’t pass drop events automatically to plugins and you have to catch them via Javascript and pass them to Silverlight, plus I’ve read that in MacOS-X Firefox doesn’t support this at all.
Even worse, Microsoft’s workaround article has a typo in the Javascript (should call dragDrop instead of drop) and there is a chance it doesn’t work in latest version of Safari. For more see:
http://msdn.microsoft.com/en-us/library/ee670998%28v=vs.95%29.aspx
http://www.telerik.com/forums/dropping-files-using-safari-on-mac (this says one can use HTML5 events and the Silverlight HTML/Javascript Bridge to notify Silverlight)
http://www.thebuzzmedia.com/html5-drag-and-drop-and-file-api-tutorial/
HowTo: Take screenshot on Windows desktop, Windows 8 and MacOS-X
copying from an e-mail I received from Skype support:
Taking a screenshot on Windows desktop
1. On your keyboard, press the Print Screen (Prt Scr) key to take a screenshot of your entire desktop. To take a screenshot of an active window, press the Alt+Print Screen (Prt Scr) key combination.
2. Save a copy of the image in Microsoft Paint. To do so, simply click Start > All Programs/Programs > Accessories > Paint.
3. Press the Ctrl+V key combination to paste your screenshot into Paint.
4. Go to the menu and click File > Save. Make sure you can remember where you save the image to, as you’ll need to find the file to attach the image in an email.
5. Enter a file name.
6. In the Save as type: drop-down menu, select JPEG.
7. Click Save.
Taking a screenshot on Windows 8
On your keyboard, press the Windows + Print Screen (Prt Scr) key combination. A screenshot of the entire screen is taken. To take a screenshot of an active window, press the Alt + Print Screen (Prt Scr) key combination. The screenshots are automatically saved in your Screenshots folder.
To find the folder:
1. In the Start screen, press the Windows key. Windows 8 switches to classic view.
2. Open the File Explorer from the task bar.
3. Under the Libraries folder on the left side, select Pictures. Your Screenshots folder is located here.
Taking a screenshot on Mac
On your keyboard, press the Command+Shift+4+Spacebar key combination and click the window you want to take a screenshot of.
To take a screenshot of your entire desktop, press the Command+Shift+3 key combination. To capture a portion of the desktop, press the Command+Shift+4 key combination. A cross-hair cursor will appear. Simply click and drag the cursor to select the area you’d like to capture. To save the screenshot, just release the mouse button.
The screenshots will be saved on your desktop in .png format.
Should you have further concerns or clarifications, please do not hesitate to contact us again.
It’s nice that Windows 8 now has a Screenshots folder under a user’s account folder, this is similar behaviour to the facility that Dropbox includes for taking screenshots directly to a Screenshots subfolder under your Dropbox folder. Wonder though why Windows key is needed to be pressed and what will happen if you just press PrintScreen on the Windows 8 home screen (Metro/Modern UI).
Also, wonder why Apple keeps on using those cryptic key combinations for doing things (sticking to MacOS legacy I guess).
Troubleshooting: Silverlight installation on MacOS-X
One of our ClipFlair Studio users reported on having some issue trying to install Silverlight on MacOS-X, so I gathered some related info below:
First of all, at the Silverlight installation webpage, at the System Requirements tab, you can find the following requirements:
- Macintosh (Intel-based) Intel Core Duo 1.83-gigahertz (GHz) or higher processor with 512-MB of RAM
- Macintosh OS 10.5.7+ (Intel-based)
- Firefox 3.6+ or Safari 4+ web browser (note that Safari isn’t supported on Windows since it doesn’t support plugins I think)
- So, if you use Chrome, checkout https://support.google.com/chrome/answer/2445334?hl=en, although those instructions applied to Silverlight 4. With Silverlight 5 which doesn’t officially support Google Chrome on MacOS-X (supports it only on Windows), there is a serious issue with text input.
- Also I’d suggest using Mozilla Firefox instead of Safari.
If the Mac User already has Silverlight installed but has problems using the Silverlight component take the following steps in Removing Silverlight plugins on Macintosh:
- Double-click the hard drive icon on your desktop
- Find the plugin by Navigating to your Internet Plug-Ins directory: /Library/Internet Plug-Ins/
Remove the plugin by Dragging any of the following into your trash bin:
- Silverlight.plugin
- WPFe.plugin
The Mac OS X 10.7 (Lion) and higher versions of Mac Operating Systems seem to have the feature called "Resume" which ensures that the Mac system will recall the state of applications and files just before you quit which would allow you to open them up again, and just pick up from where you left off.
However, the "Resume" feature may be a stumbling block when it comes to installing Silverlight.
Therefore, it might be a good idea if we turn off the "Resume" feature temporarily in order to install Silverlight.
If you have a Mac OS X 10.7 (Lion) or higher version then:
- Go to System Preferences.
- Go to "General" Tab.
- Make sure "Restore windows when quitting and re-opening apps" is unchecked.
After successful Silverlight installation you can go back and select that option again.
Ensure that you quit all browsers on the Mac before the installation of Silverlight.
- From the top menu bar use Quit action to exit the browser. Do the same for all open browsers (e.g. Safari or Mozilla Firefox). Else see above how to set your system to not restore applications after reboot.
- Shutdown your Mac, and then start up your Mac again.
- Make sure all browser applications have been quited (don’t just close their open windows, you need to select the Quit menu action to close the browser process).
After following the above steps, to install Silverlight do the following:
- Navigate to the folder where your browser places downloaded files.
- Click on the Silverlight installation file (should be a file with the extension .pkg or it might be file with extension .dmg which contains a file with extension .pkg)
- Run the installation (the .pkg file)
